Friends, DJs, musicians, once again I have run across software that is super-cool-awesome but is a little weak in the instructions department. Maybe I'm just slow. Whatever the case my be, I have set up Touch OSC for my iPhone, and have it controlling Traktor 3 on my Windows XP laptop. Simple enough? No! This is my attempt to make it as simple, or at least as thorough, as possible. With hope, this will be helpful to someone—including me when I forget how I did this in the first place.
STEP ONE: DOWNLOAD THE RAW MATERIALS
1. TOUCH OSC—Get yourself Touch OSC. Go to your iPhone or iPad. Click on the Applications icon and do a search for Touch OSC. Or get it from iTunes. As of December 2010, it is $4.99.
The develope who made Touch OSC has a website at Hexler.net
2. MIDI YOKE—Get yourself Midi Yoke. It's a program that's been around for several years that basically turns the signals from your Ipod-pad-phone into midi signals. Download it HERE or go to their WEBSITE (this is easier to navigate, trust me).
3. PURE DATA EXTENDED—Download Pure Data Extended. I don't know why. But you must install it.
4. PURE DATA FILES—Now you have to download some Pure Data configuration files. Again, don't ask. Just do it. Get it HERE. There are other configuration files that you can download, but let's get you up and running first.
SUMMARY
You will be downloading, and installing four (5) programs/files to your PC.
- Touch OSC (from iTunes)
- Midi Yoke [get it]
- Pure Data Extended [get it]
- Pure Data Basic [get it]
- Pure Data mix2-midi.pd [get it]
STEP TWO: SETTINGS
2.1 Setting up Touch OSC on your iPhone-pad-pod
Once you set up Touch OSC and open it, you will see one of two configuration screens. Slide over to the one that says NETWORK. There will be four fields.
- Hostname (more than likely, something like 192.168.1.x)
- Port (outgoing) 9000
- Port (incoming) 8000
- Local IP address
(this should already have a number in it)
- Go to the START menu and click on RUN.
- In the popup window, type CMD
- In the DOS popup window, type ipconfig /all
- A bunch of information will appear including:
Connection-specific DNS Suffix . :
Description . . . . . . . . . . . : Intel(R) Wireless WiFi Link xxxxxx
Physical Address. . . . . . . . . : 00-00-00-00-00-00
Dhcp Enabled. . . . . . . . . . . : Yes
Autoconfiguration Enabled . . . . : Yes
IP Address. . . . . . . . . . . . : 192.168.1.3
Subnet Mask . . . . . . . . . . . : xxx.xxx.x.x
Default Gateway . . . . . . . . . : xxx.xxx.x.x
DHCP Server . . . . . . . . . . . : xxx.xxx.x.x
DNS Servers . . . . . . . . . . . : xxx.xxx.x.x
You are looking for the number on line:
IP Address. . . . . . . . . . . . : 192.168.1.3
Enter this number on the Touch OSC Host line.
If you want to see where I got this information, go to wirelessforums.org.
2.2 Setting up Midi Yoke on your Windows PC
- Install the file
- Reboot your computer
- Midi Yoke is now where it is supposed to be so go to the next step.
2.3 Setting up Extended Pure Data on your Windows PC
- Install the file.
- No need to reboot.
- Open the program. It will need to be running for Touch OSC to connect to your DJ program. In my case, this is Traktor 3.
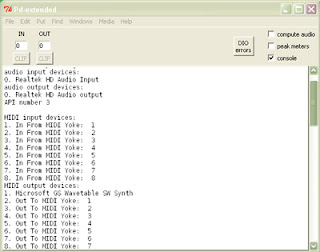
- The program window will open. It will have a bunch of code in it, gibberish more or less. That's ok. Note that somewhere in the lines of code, you will see evidence of Midi Yoke running:
1. In From MIDI Yoke: 1
2. In From MIDI Yoke: 2
3. In From MIDI Yoke: 3
4. In From MIDI Yoke: 4
5. In From MIDI Yoke: 5
6. In From MIDI Yoke: 6
7. In From MIDI Yoke: 7
8. In From MIDI Yoke: 8
MIDI output devices:
1. Microsoft GS Wavetable SW Synth
2. Out To MIDI Yoke: 1
3. Out To MIDI Yoke: 2
4. Out To MIDI Yoke: 3
5. Out To MIDI Yoke: 4
6. Out To MIDI Yoke: 5
7. Out To MIDI Yoke: 6
8. Out To MIDI Yoke: 7
9. Out To MIDI Yoke: 8
This is a good thing. It means that Extended Pure Data (or Extended PD as it's also known) is recognizing Midi Yoke. Below is a screenshot of Extended PD.

All that Midi Yoke does is take whatever signals are coming from the iPhone-Pad-Pod and converting it to midi signals.
2.4 Connect Midi Yoke
- Go to the Main Menu bar and select Media > Midi settings...

- Press the Output to Device 1 button. You will get this drop down menu. Select Out to Midi Yoke: 1.

Midi Yoke is now activated.
2.5 Setting up Extended Pure Data Configuration File on your Windows PC
- This will seem a little backward, but go to your iPhone-Pad-Pod and run the Touch OSC application.
- Go to the main option screen. You will know you're there because you'll see the following fields: Network, Layout, and Options.
- Tap on the Layout field and choose Mix 2. Technically you can choose any of the options, but I think this is the easiest way to go. When you get this working, then you can go and select other options. Be sure to click Done.
- Go back to Extended Pure Data, select File from the menu, and open the file named mix2-midi.
- If you cannot find this file for some reason, you can download it here. It's actually somewhere in the middle of the Hexler Touch OSC site, although it's located under the midi heading, it's still not in the easiest to find spot. You will also be able to find the corresponding files for the other Touch OSC configuration options under the midi heading.
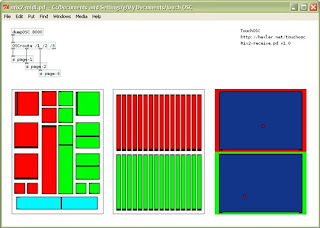
- Once mix2-midi is opened, another Extended PD will pop up. For mix2-midi you will see a representation of the three screens on your iPhone-Pad-Pod.
- Now the moment of triumph. Go to your iPhone-Pad-Pod and start moving the controllers around. If everything went right, then you will see a little black line moving around.

2.6 Programs that need to be running
- Touch OSC on your iPhone-Pad-Pod
- Extended Pure Data w. the Extended Pure Data mix2-midi.pd window.
- Traktor 3 (or whatever DJ program you have)
3.0 Start your DJ program
- In the case of Traktor 3, go to File > Midi Setup and open the midi setup window
- Click on Midi Interfaces

- In the Midi In window (the top one) click on the first box under the Active column and click it and an X will appear in it. Notice that to the right it should read: In From Midi Yoke: 1 [Emulated]. This tells Traktor to treat your iPhone-Pad-Pod as a midi device.
- Go to the Midi Setup option (just below Midi Interfaces) and start assigning the Touch OSC keys.
- At this point, you are on your way to a better tomorrow.
4.0 Notes
4.1 Assorted Source-Resource Pages
No comments:
Post a Comment